Arun KL
November 14, 2023
8minutes
Growing trends in cyber attacks made system administrators implement more secured communication protocols to protect their assets and network from attacks. TLS plays a vital role in the implementation stack. TLS is a critical security protocol that is used to encrypt communications between clients and servers. TLS 1.3 is the latest version of the Transport Layer Security (TLS) protocol and offers many advantages over their previous versions. TLS 1.2 is the most widely used version of the TLS protocol, but TLS 1.3 is gaining popularity. As a system administrator, you should enable TLS 1.2 and TLS 1.3 on your Windows Server to enhance the security of your infrastructure.
Why Should You Enable TLS 1.2 and TLS 1.3 on Windows Server?
As a windows administrator, it is not just your duty to take care the system’s health. But, it is also your responsibility to create a secure environment to protect your Windows from internal and external threats. TLS 1.2 and TLS 1.3 are the new and most secure transport layer security protocols. As a system administrator, you should enable TLS 1.2 and TLS 1.3 on your Windows Server for the following reasons:
- Both TLS 1.2 and TLS 1.3 introduces new cryptographic suites that offer better security than the suites used in older TLS and SSL protocols.
- Both TLS 1.2 and TLS 1.3 are more resistant to man-in-the-middle attacks and simplify the handshake process, which makes it more difficult for attackers to eavesdrop on communications.
- TLS 1.3 simplifies the handshake process and removes unnecessary cryptographic overhead, which results in a faster connection time.
How to Enable TLS 1.2 and TLS 1.3 on Windows Server?
We have covered 3 different ways to enable TLS 1.2 and TLS 1.3 on your Windows Server in this post. You can choose any one of the three ways to enable TLS 1.2 and TLS 1.3 on your Windows Server depending on your technical and automation skills.
- Enable TLS 1.2 and TLS 1.3 manually using Registry
- Enable TLS 1.2 and TLS 1.3 using Powershell Commands
- Enable TLS 1.2 and TLS 1.3 using CMD
Microsoft clearly said that it supports TLS 1.3 only on Windows 10 (version 1903 later), Windows 11, Windows Server 2022, and above operating systems. No support will be provided for TLS 1.3 below Windows 10 22H2 and Windows Server 2022. You can refer to the below table that shows the Microsoft Schannel Provider support of TLS protocol versions.
Note: Windows 2019 does not support TLS 1.3.
TLS Protocols Supported by Windows Operating Systems:
| Windows OS | TLS 1.0 Client | TLS 1.0 Server | TLS 1.1 Client | TLS 1.1 Server | TLS 1.2 Client | TLS 1.2 Server | TLS 1.3 Client | TLS 1.3 Server |
|---|---|---|---|---|---|---|---|---|
| Windows Vista/Windows Server 2008 | Enabled | Enabled | Not supported | Not supported | Not supported | Not supported | Not supported | Not supported |
| Windows Server 2008 with Service Pack 2 (SP2) | Enabled | Enabled | Disabled | Disabled | Disabled | Disabled | Not supported | Not supported |
| Windows 7/Windows Server 2008 R2 | Enabled | Enabled | Disabled | Disabled | Disabled | Disabled | Not supported | Not supported |
| Windows 8/Windows Server 2012 | Enabled | Enabled | Enabled | Enabled | Enabled | Enabled | Not supported | Not supported |
| Windows 8.1/Windows Server 2012 R2 | Enabled | Enabled | Enabled | Enabled | Enabled | Enabled | Not supported | Not supported |
| Windows 10, version 1507 | Enabled | Enabled | Enabled | Enabled | Enabled | Enabled | Not supported | Not supported |
| Windows 10, version 1511 | Enabled | Enabled | Enabled | Enabled | Enabled | Enabled | Not supported | Not supported |
| Windows 10, version 1607/Windows Server 2016 Standard | Enabled | Enabled | Enabled | Enabled | Enabled | Enabled | Not supported | Not supported |
| Windows 10, version 1703 | Enabled | Enabled | Enabled | Enabled | Enabled | Enabled | Not supported | Not supported |
| Windows 10, version 1709 | Enabled | Enabled | Enabled | Enabled | Enabled | Enabled | Not supported | Not supported |
| Windows 10, version 1803 | Enabled | Enabled | Enabled | Enabled | Enabled | Enabled | Not supported | Not supported |
| Windows 10, version 1809//Windows Server 2019 | Enabled | Enabled | Enabled | Enabled | Enabled | Enabled | Not supported | Not supported |
| Windows 10, version 1903 | Enabled | Enabled | Enabled | Enabled | Enabled | Enabled | Not supported | Not supported |
| Windows 10, version 1909 | Enabled | Enabled | Enabled | Enabled | Enabled | Enabled | Not supported | Not supported |
| Windows 10, version 2004 | Enabled | Enabled | Enabled | Enabled | Enabled | Enabled | Not supported | Not supported |
| Windows 10, version 20H2 | Enabled | Enabled | Enabled | Enabled | Enabled | Enabled | Not Supported | Not Supported |
| Windows 10, version 21H1 | Enabled | Enabled | Enabled | Enabled | Enabled | Enabled | Not Supported | Not Supported |
| Windows 10, version 21H2 | Enabled | Enabled | Enabled | Enabled | Enabled | Enabled | Not Supported | Not Supported |
| Windows Server 2022 | Enabled | Enabled | Enabled | Enabled | Enabled | Enabled | Enabled | Enabled |
| Windows 11 | Enabled | Enabled | Enabled | Enabled | Enabled | Enabled | Enabled | Enabled |
Method 1 : Enable TLS 1.2 and TLS 1.3 manually using Registry
Let’s begin learning how to enable TLS 1.2 and TLS 1.3 manually using Windows Registry.
Method 1 : Enable TLS 1.2 and TLS 1.3 manually using Registry
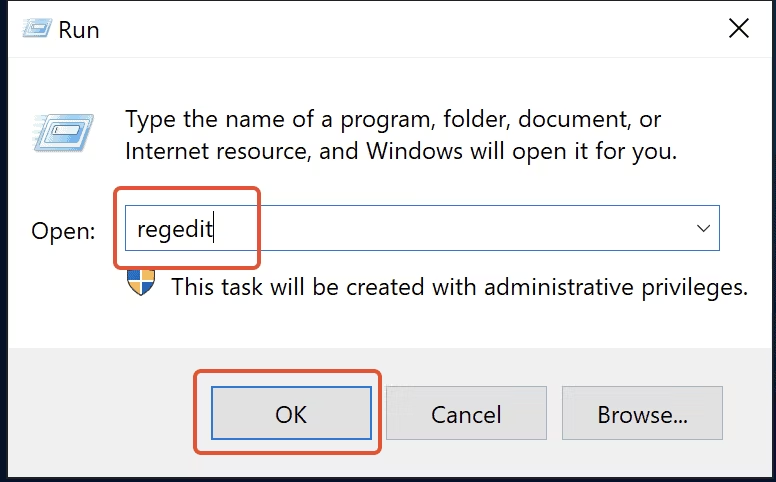
Step 1. Open regedit utility
Open ‘Run‘, type ‘regedit‘ and click ‘OK‘.

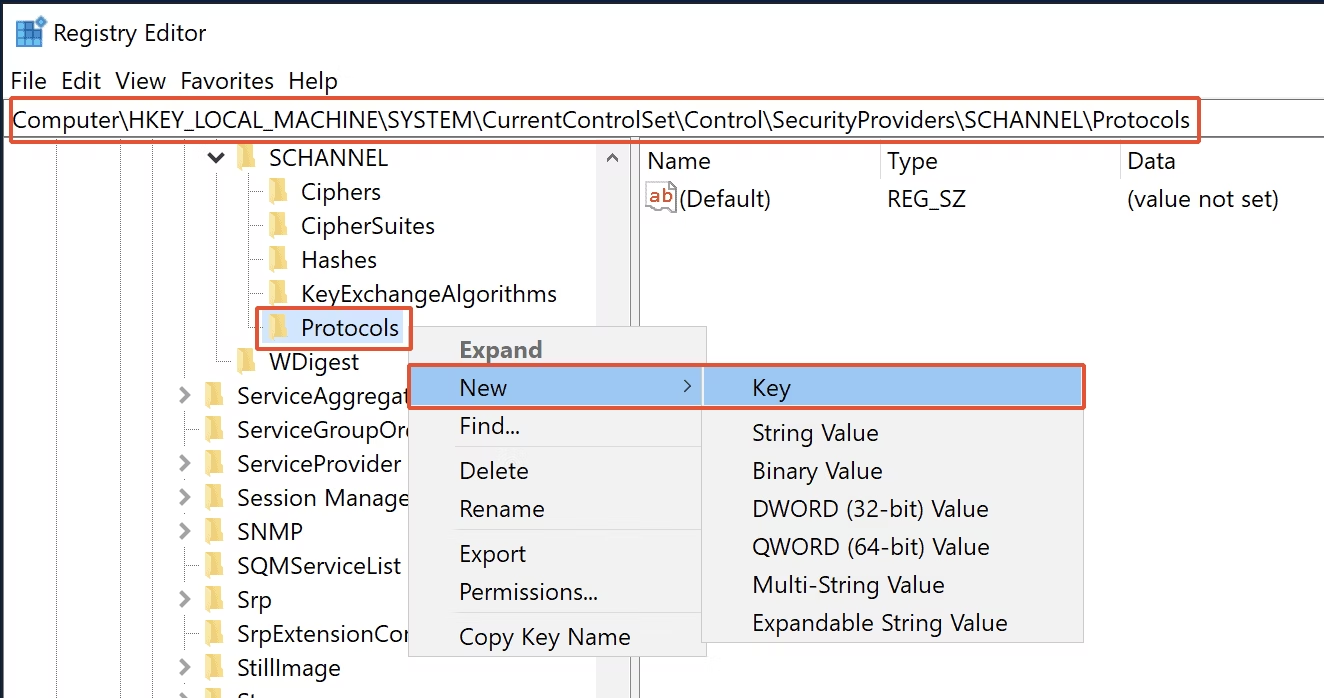
Step 2. Create New Key
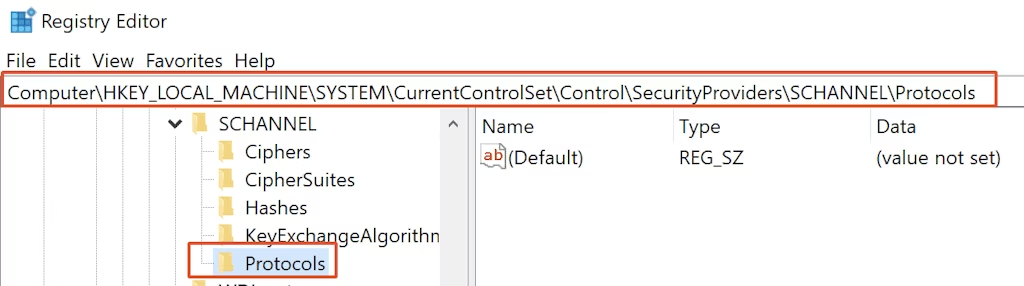
In Registry Editor, navigate to the path : HKEY_LOCAL_MACHINE\SYSTEM\CurrentControlSet\Control\SecurityProviders\SCHANNEL\Protocols
Create a new key by Right click on ‘Protocols‘ –> New –> Key

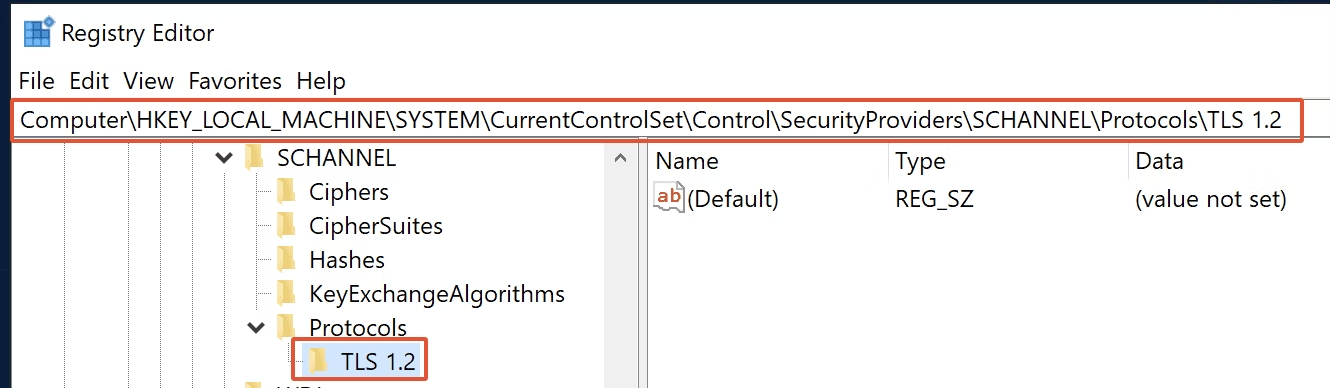
Step 3. Rename the Registry Key ‘TLS 1.2’
Rename the registry key as ‘TLS 1.2‘.

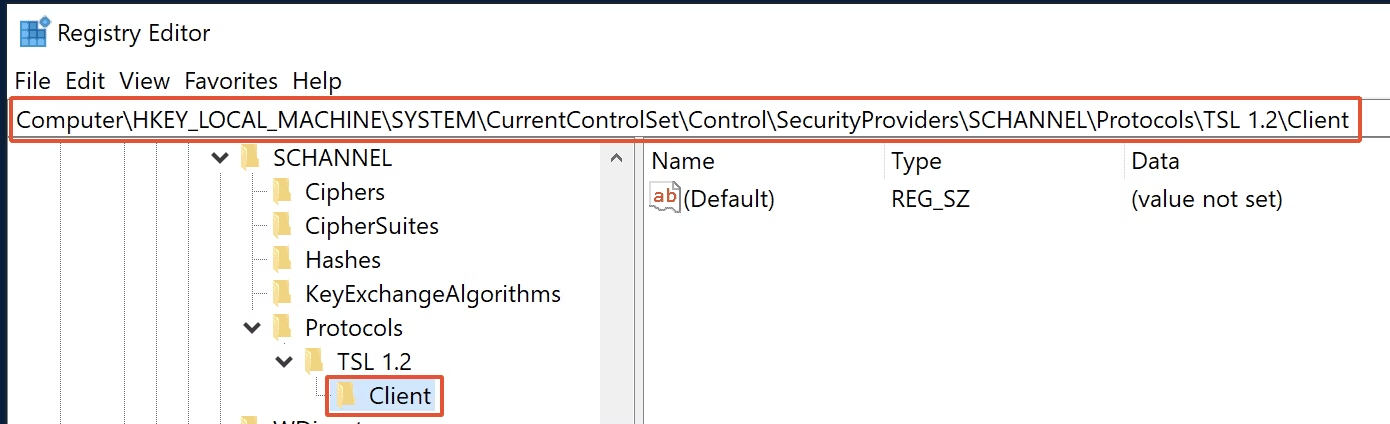
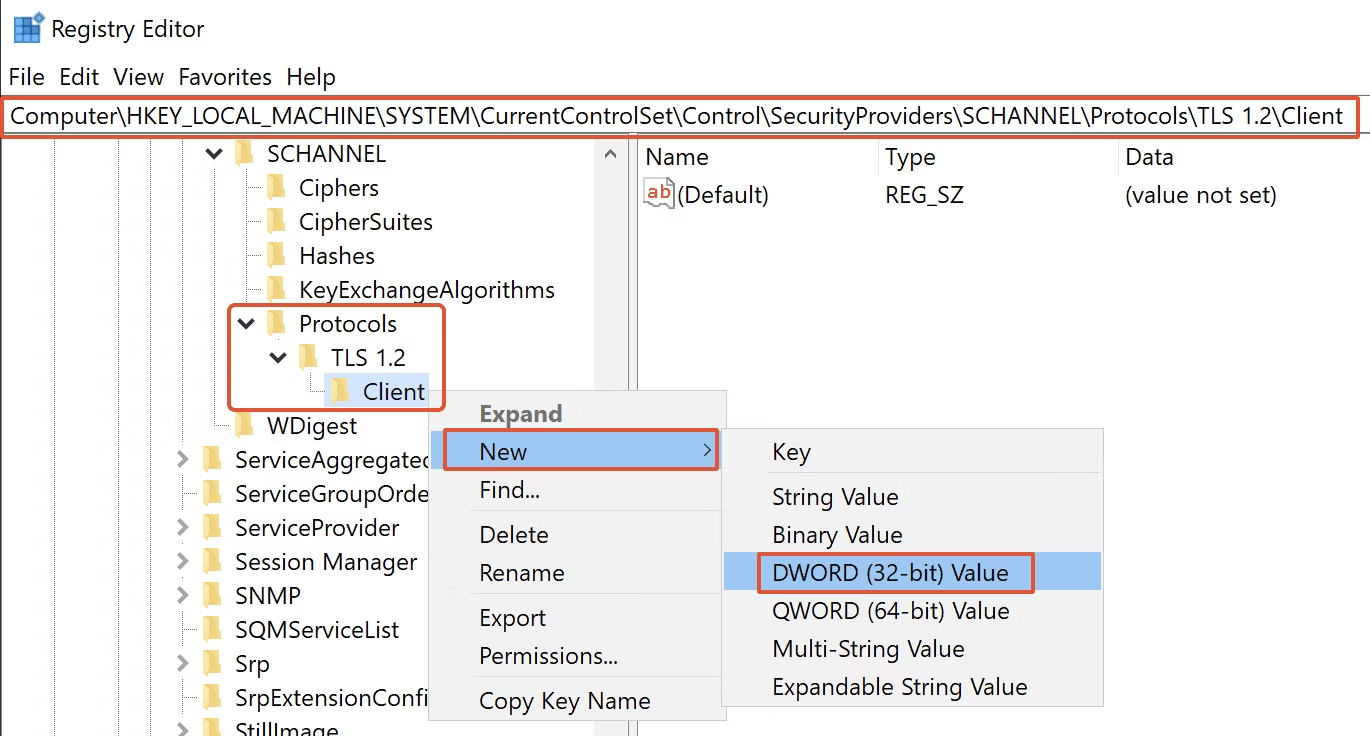
Step 4. Create One More Registry Key ‘Client’ underneath ‘TLS 1.2’
As smiler to the above step, create another key as ‘Client‘ underneath ‘TLS 1.2‘ as shone in this picture.

Step 5. Create New Item ‘DWORD (32-bit) Value’ Underneath ‘Client’, select ‘New’
Create new item by right click on ‘Client‘, select ‘New’ –> DWORD (32-bit) Value.

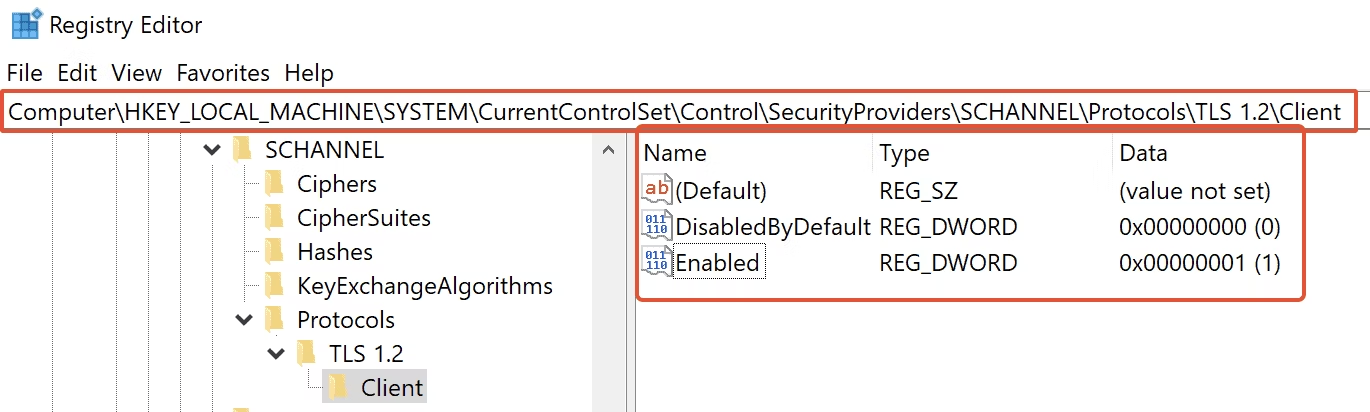
Step 6. Rename the Item ‘DWORD (32-bit) Value’ to ‘DisabledByDefault’
Name the item as ‘DisabledBy Default’ with Hexadecimal value as ‘0’.

Step 7. Create another item, ‘Enabled’ Underneath TLS 1.2
Similarly create another item, ‘Enabled‘ with Hexadecimal value as ‘1‘.


Step 8. List of Item Created underneath ‘Client’
After registry item creations underneath ‘Client’, it looks as below.

Step 9. Create ‘Server’ and corresponding Keys as in the case of ‘Client’
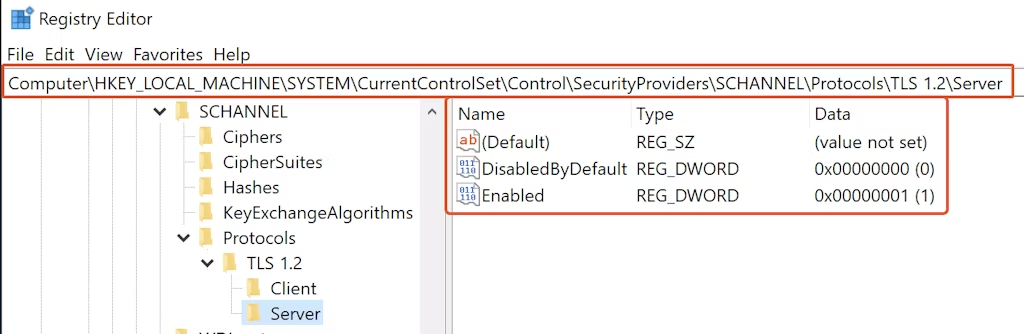
Similar to above steps, create a key ‘Server’ under ‘Protocols’ and create ‘DWORD (32-bit)’ and ‘Enabled’ as shown below.
– HKEY_LOCAL_MACHINE\SYSTEM\CurrentControlSet\Control\SecurityProviders\SCHANNEL\Protocols\TLS 1.2\Server\Enabled with Hexadecimal value as ‘1’– HKEY_LOCAL_MACHINE\SYSTEM\CurrentControlSet\Control\SecurityProviders\SCHANNEL\Protocols\TLS 1.2\Server\DisabledByDefault with Hexadecimal value as ‘0’

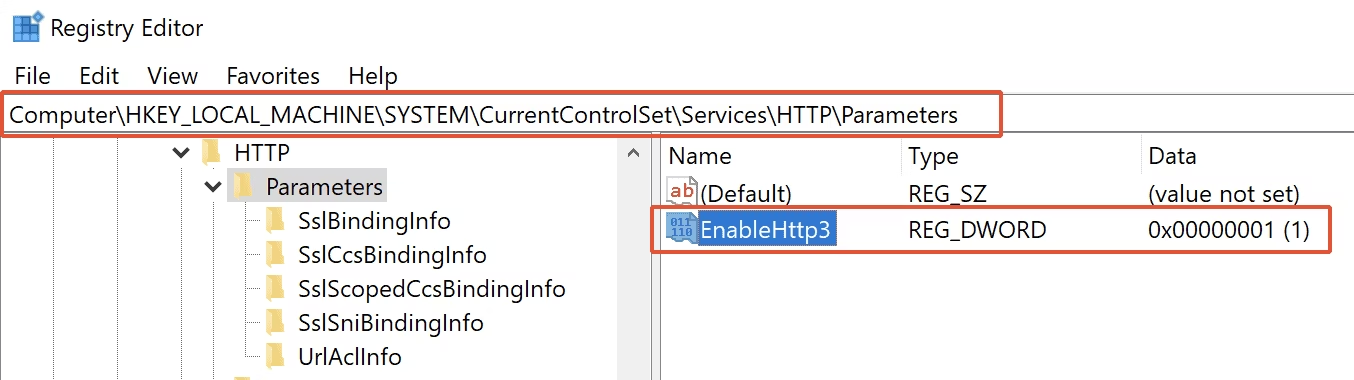
Step 10. Enable TLS 1.3 on the Windows Server
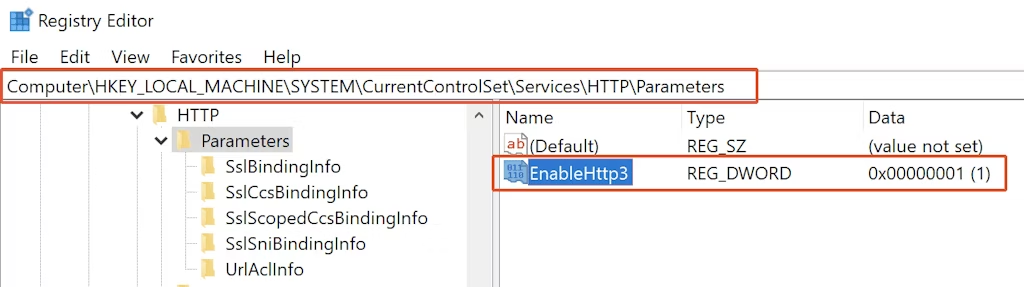
Similar to above steps, create a ‘DWORD (32-bit)’ and ‘Enabled’ items in the below path to enable TLS 1.3
Note: TLS 1.3 is supported in Windows 11 & Windows server 2022 onwards.
– HKEY_LOCAL_MACHINE\SYSTEM\CurrentControlSet\Services\HTTP\Parameters\EnableHTTP3 with Hexadecimal value as ‘1’

Method 2 : Enable TLS 1.2 and TLS 1.3 on Windows Server using Powershell Commends
Follow this simple procedure to enable TLS 1.2 and TLS 1.2 using Powershell comments.
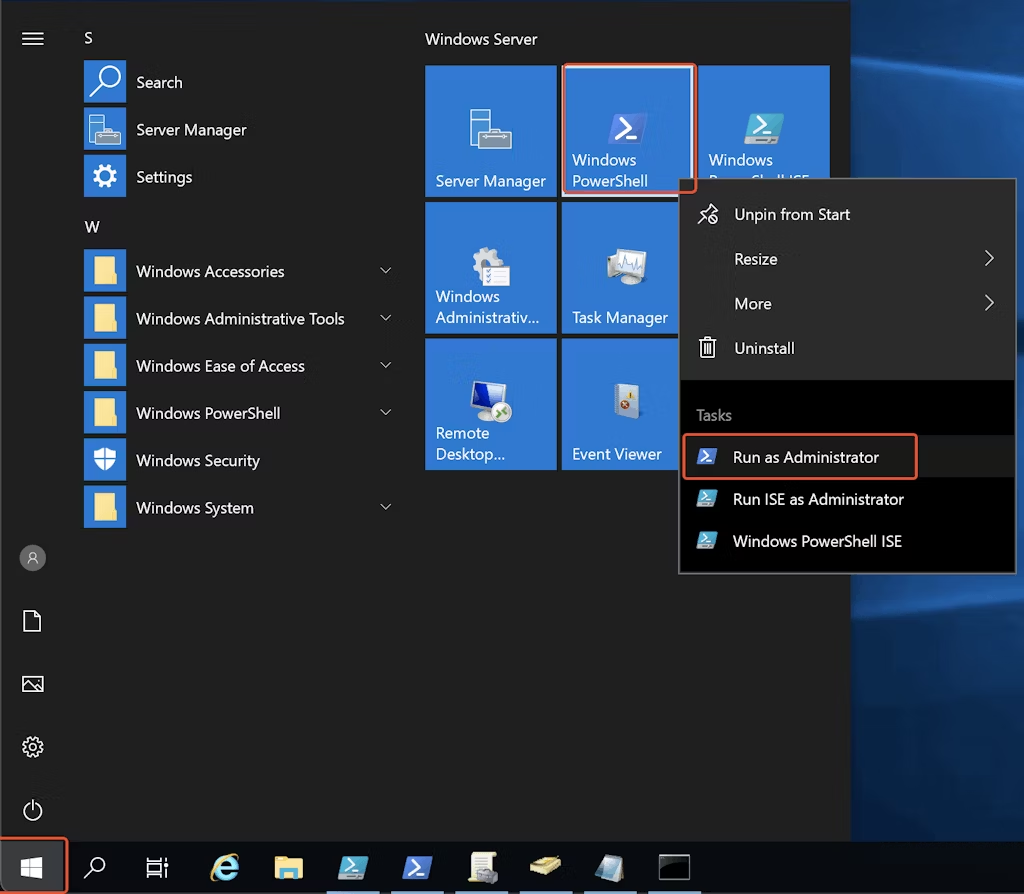
Step 1. Open Powershell as Administrator

Step 2. Run below commands to create Registry entry
TLS 1.2
- New-Item 'HKLM:\SYSTEM\CurrentControlSet\Control\SecurityProviders\SCHANNEL\Protocols\TLS 1.2\Client' -Force

- New-ItemProperty -Path 'HKLM:\SYSTEM\CurrentControlSet\Control\SecurityProviders\SCHANNEL\Protocols\TLS 1.2\Client' –PropertyType 'DWORD' -Name 'DisabledByDefault' -Value '0'

- New-ItemProperty -Path 'HKLM:\SYSTEM\CurrentControlSet\Control\SecurityProviders\SCHANNEL\Protocols\TLS 1.2\Client' -PropertyType 'DWORD' -Name 'Enabled' -Value '1'


- New-Item 'HKLM:\SYSTEM\CurrentControlSet\Control\SecurityProviders\SCHANNEL\Protocols\TLS 1.2\Server' -Force

- New-ItemProperty -Path 'HKLM:\SYSTEM\CurrentControlSet\Control\SecurityProviders\SCHANNEL\Protocols\TLS 1.2\Server' –PropertyType 'DWORD' -Name 'DisabledByDefault' -Value '0'

- New-ItemProperty -Path 'HKLM:\SYSTEM\CurrentControlSet\Control\SecurityProviders\SCHANNEL\Protocols\TLS 1.2\Server' –PropertyType 'DWORD' -Name 'Enabled' -Value '1'


TLS 1.3 (Supports in Windows 11 & Windows Server 2022)
- New-ItemProperty -Path 'HKLM:\SYSTEM\CurrentControlSet\services\HTTP\Parameters' -PropertyType 'DWORD' -Name 'EnableHttp3' -Value '1'
Before running the commands you can see no items were exist underneath Protocol.

After running the commands you can see there are two keys created ‘TLS 1.2’ & ‘TLS 1.3’, Underneath each protocols there are ‘Client’ &’Server’ Keys inside them ther are two items ‘DisableByDefault’ & ‘Enabled’.


Method 3: Enable TLS 1.2 and TLS 1.3 on Windows Server using native CMD
Follow this simple procedure to enable TLS 1.2 and TLS 1.2 using CMD comments.
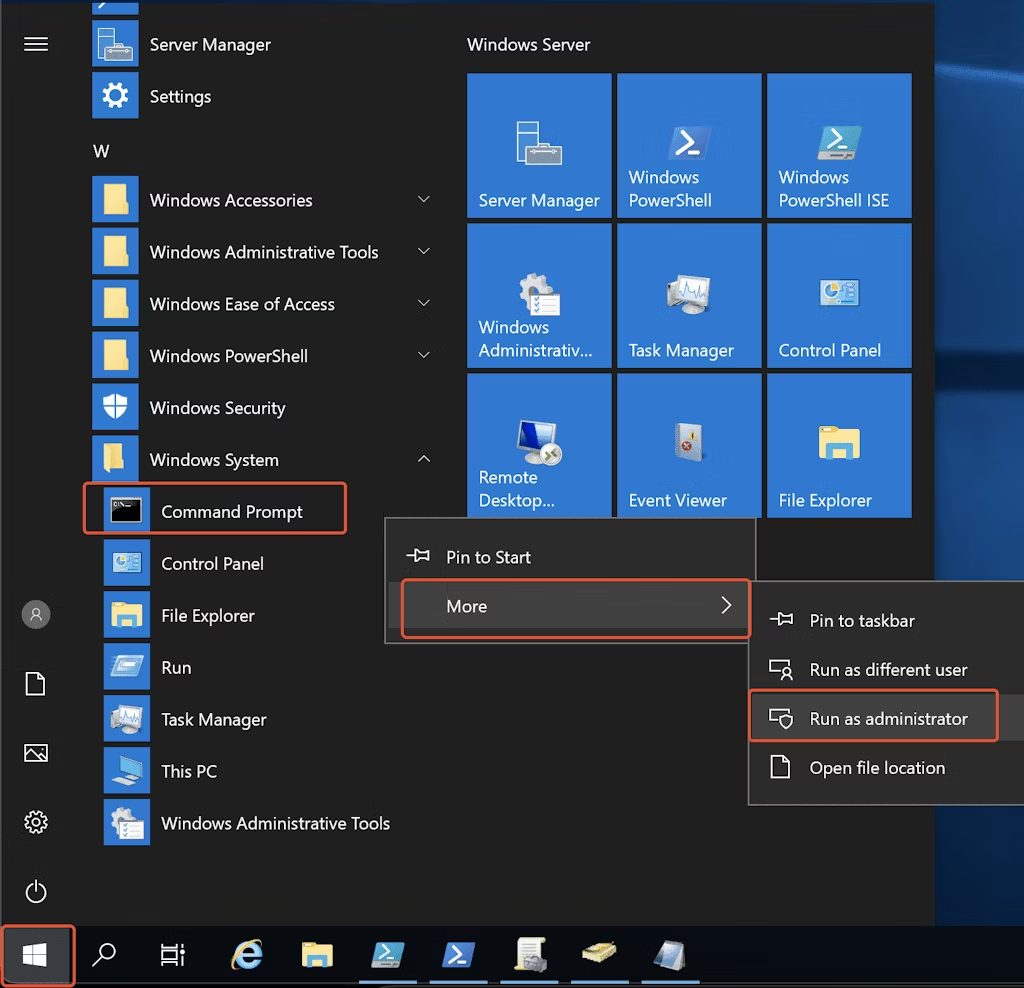
Step 1. Open ‘Command Prompt’ as Administrator

Step 2. Run below commands to create Registry entry.
TLS 1.2
- reg add "HKEY_LOCAL_MACHINE\SYSTEM\CurrentControlSet\Control\SecurityProviders\SCHANNEL\Protocols\TLS 1.2\Client" /v DisabledByDefault /t REG_DWORD /d 0 /f

- reg add "HKEY_LOCAL_MACHINE\SYSTEM\CurrentControlSet\Control\SecurityProviders\SCHANNEL\Protocols\TLS 1.2\Client" /v Enabled /t REG_DWORD /d 1 /f


- reg add "HKEY_LOCAL_MACHINE\SYSTEM\CurrentControlSet\Control\SecurityProviders\SCHANNEL\Protocols\TLS 1.2\Server" /v DisabledByDefault /t REG_DWORD /d 0 /f

- reg add "HKEY_LOCAL_MACHINE\SYSTEM\CurrentControlSet\Control\SecurityProviders\SCHANNEL\Protocols\TLS 1.2\Server" /v Enabled /t REG_DWORD /d 1 /f


TLS 1.3 (Supports in Windows 11 & Windows Server 2022)
- reg add "HKEY_LOCAL_MACHINE\SYSTEM\CurrentControlSet\services\HTTP\Parameters" /v EnableHttp3 /t REG_DWORD /d 1 /f
We hope this post will help you know how to enable TLS 1.2 and TLS 1.3 on your Windows Server to enhance the security of your infrastructure. Please share this post if you find this interesting. Visit our social media page on Facebook, LinkedIn, Twitter, Telegram, Tumblr, Medium & Instagram, and subscribe to receive updates like this.
- How to Enable TLS 1.2 and TLS 1.3 via Group Policy
- How to Disable TLS 1.0 and TLS 1.1 on Windows Server?
- How to Disable TLS 1.0 and TLS 1.1 on Your Nginx Server?
- How to Disable TLS 1.0 and TLS 1.1 on Your Apache Server?
- How to Disable TLS 1.0 and TLS 1.1 via Group Policy
Source :
https://thesecmaster.com/blog/how-to-enable-tls-1-2-and-tls-1-3-on-windows-server