WordPress 6.5.5 Security Release – What You Need to Know

Alex Thomas
June 25, 2024

Did you know Wordfence runs a Bug Bounty Program for all WordPress plugin and themes at no cost to vendors? Researchers can earn up to $10,400for all in-scope vulnerabilities submitted to our Bug Bounty Program! Find a vulnerability, submit the details directly to us, and we handle all the rest. For a limited time, all high risk issues are in-scope for all researchers!


WordPress Core 6.5.5 was released yesterday, on June 24, 2023. Contained within this release are three security fixes addressing two Cross-Site Scripting (XSS) vulnerabilities and one Windows-specific Directory Traversal vulnerability. Despite these vulnerabilities being medium-severity, the worst of them (specifically, the XSS vulnerabilities) can allow for site takeover by an authenticated, contributor-level user if successfully exploited.

The Directory Traversal vulnerability has been backported to every version of WordPress since 4.1, with the XSS vulnerabilities being backported to the major version in which the functionality was released. WordPress has supported automatic core updates for security releases since WordPress 3.7, and the vast majority of WordPress sites should receive a patch for their major version of WordPress automatically over the next 24 hours. We recommend verifying that your site has been automatically updated to one of the patched versions. Patched versions are available for every major version of WordPress since 4.1, so you can update without risking compatibility issues.

The Wordfence Threat Intelligence Team released a new firewall rule the same day to protect Wordfence PremiumWordfence Care, and Wordfence Response customers for one of the XSS vulnerabilities that didn’t have adequate protection.This rule will be available to free Wordfence users in 30 days, on July 24th, 2024. All Wordfence users have protection for the remaining two vulnerabilities.

If your site has not been updated automatically we strongly recommend updating manually as soon as possible, as two of the vulnerabilities patched in this release can be used by an attacker with a low-privileged contributor-level account to take over a site.

Technical Analysis and Overview

As with every WordPress core release containing security fixes, the Wordfence Threat Intelligence team analyzed the code changes in detail to evaluate the impact of these vulnerabilities on our customers, and to ensure our customers remain protected.

Contributor+ Stored Cross-Site Scripting in the HTML API

Description: WordPress Core < 6.5.5 – Authenticated (Contributor+) Stored Cross-Site Scripting via HTML API
Affected Versions: WordPress Core < 6.5.5
Researcher/s: Alex Concha (WordPress Security Team)Dennis Snell (WordPress Core Team)Grzegorz Ziółkowski (WordPress Security Team)Aaron Jorbin
CVE ID: Pending
CVSS Score: 6.4 (Medium)
CVSS Vector: CVSS:3.1/AV:N/AC:L/PR:L/UI:N/S:C/C:L/I:L/A:N
Fully Patched Version: 6.5.5
Link to Commit 1
Link to Commit 2

WordPress Core is vulnerable to Stored Cross-Site Scripting via the HTML API in various versions up to 6.5.5 due to insufficient input sanitization and output escaping on URLs. This makes it possible for authenticated attackers, with contributor-level access and above, to inject arbitrary web scripts in pages that will execute whenever a user accesses an injected page.

The changeset in WordPress 6.5.5 adds additional protections in the set_attribute() function of the HTML API to further escape URL attributes. Additionally, this changeset adds additional improvements.

Contributor+ Stored Cross-Site Scripting in the Template Part Block

Description: WordPress Core < 6.5.5 – Authenticated (Contributor+) Stored Cross-Site Scripting via Template Part Block
Affected Versions: WordPress Core < 6.5.5
Researcher/s: Rafie Muhammad (Patchstack)
CVE ID: Pending
CVSS Score: 6.4 (Medium)
CVSS Vector: CVSS:3.1/AV:N/AC:L/PR:L/UI:N/S:C/C:L/I:L/A:N
Fully Patched Version: 6.5.5
Link to Commit

WordPress Core is vulnerable to Stored Cross-Site Scripting via the Template Part block in various versions up to 6.5.5 due to insufficient input sanitization and output escaping on the ‘tagName’ attributes. This makes it possible for authenticated attackers, with contributor-level access and above, to inject arbitrary web scripts in pages that will execute whenever a user accesses an injected page.

The changeset for WordPress 6.5.5 adds additional sanitization to the Template Part block’s ‘tagName’ attribute. The Template Part block is available to contributor-level users. However, exploitation is only possible where the site’s theme uses this particular block.

Windows-only Directory Traversal

Description: WordPress Core < 6.5.5 – Authenticated (Contributor+) Directory Traversal
Affected Versions: WordPress Core < 6.5.5
Researcher/s: apple502jRafie Muhammad (Patchstack)Edouard L David Fifieldx89mishre
CVE ID: Pending
CVSS Score: 4.3 (Medium)
CVSS Vector: CVSS:3.1/AV:N/AC:L/PR:L/UI:N/S:U/C:N/I:L/A:N
Fully Patched Version: 6.5.5
Link to Commit

WordPress Core is vulnerable to Directory Traversal in various versions up to 6.5.5 via the Template Part block. This makes it possible for authenticated attackers, with contributor-level access and above, to include arbitrary HTML Files on sites running Windows.

Similar to the previous vulnerability, this Directory Traversal vulnerability is exploitable via the Template Part block. The changeset for WordPress 6.5.5 shows the addition of a path normalization function within the validate_file() function.

Conclusion

WordPress 6.5.5 includes patches for 3 medium-severity vulnerabilities. Two of these vulnerabilities are trivial to exploit as an authenticated, contributor+ user, and we recommend updating immediately if your site has not yet automatically done so.

We have released one new firewall rule to protect Wordfence PremiumWordfence Care, and Wordfence Response customers. This rule will be available to free Wordfence users in 30 days, on July 24th, 2024.

If you know someone who uses WordPress and isn’t keeping it automatically updated, we recommend sharing this advisory with them to ensure their site remains secure, as several of these vulnerabilities pose a significant risk.

For security researchers looking to disclose vulnerabilities responsibly and obtain a CVE ID, you can submit your findings to Wordfence Intelligence Bug Bounty Program and earn up to $10,400 for your submission.

Special thanks to István Márton, a Wordfence Vulnerability Researcher, for his assistance on reverse engineering the patches and ensuring Wordfence users have adequate coverage. 

Did you enjoy this post? Share it!

Source :
https://www.wordfence.com/blog/2024/06/wordpress-6-5-5-security-release-what-you-need-to-know/

How to Disable TLS 1.0 and TLS 1.1 on Windows Server?

Arun KL
February 13, 2024
11 minutes

Growing trends in cyber attacks made system administrators implement more secure communication protocols to protect their assets and network from attacks. TLS plays a vital role in the implementation stack. TLS is a critical security protocol that is used to encrypt communications between clients and servers. TLS 1.2 and TLS 1.3 are the two latest versions of the Transport Layer Security (TLS) protocol and offer many advantages over their previous versions. TLS 1.2 is the most widely used version of the TLS protocol, but TLS 1.3 is gaining popularity because of its efficiency and speed. As a system administrator, you should enable TLS 1.2 and TLS 1.3 on your Windows Server to enhance the security of your infrastructure, but wait, that’s not enough. You should disable TLS 1.0 and TLS 1.1 on Windows Server as they are deprecated for their weak security.

Before learning how to disable TLS 1.0 and TLS 1.1 on your Windows Server, let’s see about TLS 1.0 and TLS 1.1 and why you should disable TLS 1.0 and TLS 1.1 on your Windows Server

A Short Note About TLS 1.0 and TLS 1.1:

The Transport Layer Security (TLS) protocols are cryptographic protocols that provide communication security over the Internet. TLS 1.0 and TLS 1.1 are the two previous versions of the TLS protocol.

TLS 1.0 was first defined in 1999, and TLS 1.1 was published as an update to TLS 1.0 in 2006. TLS 1.0 and TLS 1.1 are now considered to be obsolete, and they are no longer considered secure.

Why You Should Disable TLS 1.0 and TLS 1.1 on Windows Server?

There are a few reasons why you should disable TLS 1.0 and TLS 1.1 on Windows Server:

  1. TLS 1.0 and TLS 1.1 are no longer considered secure, due to the fact that they are vulnerable to various attacks, such as the POODLE attack.
  2. Disabling TLS 1.0 and TLS 1.1 on your server will force clients to use a more secure protocol (TLS 1.2), which is less vulnerable to attack.
  3. Some government agencies, such as the US National Security Agency (NSA), have recommended that TLS 1.0 and TLS 1.1 be disabled.
  4. Microsoft will no longer provide security updates for Windows Server running TLS 1.0 and TLS 1.1.
  5. Many major software vendors are phasing out support for TLS 1.0 and TLS 1.1. This includes Google, Microsoft, Mozilla, and Apple.

Attacks TLS 1.0 and TLS 1.1 are vulnerable to:

There are a number of known vulnerabilities in TLS 1.0 and TLS 1.1 that can be exploited by attackers. These include:

  1. POODLE (Padding Oracle On Downgraded Legacy Encryption)
  2. BEAST (Browser Exploit Against SSL/TLS)
  3. CRIME (Compression Ratio Info-leak Made Easy)
  4. FREAK (Factoring Attack on RSA-EXPORT Keys)
  5. LOGJAM (Diffie-Hellman Key Exchange Weakness)

These vulnerabilities allow attackers to perform man-in-the-middle attacks, decrypt sensitive information, and hijack user sessions. By disabling TLS 1.0 and TLS 1.1 on your Windows server, you can protect yourself from these attacks.

What is the Alternate to TLS 1.0 and TLS 1.1?

The current version of the TLS protocol is TLS 1.3. TLS 1.3 was first defined in 2018, and it includes a number of security improvements over previous versions of the TLS protocol. We suggest you to enable TLS 1.2 and TLS 1.3 on your Windows Server instead of TLS 1.0 and TLS 1.1.

TLS 1.2 improves upon TLS 1.1 by adding support for Elliptic Curve Cryptography (ECC) and introducing new cryptographic suites that offer better security than the suites used in TLS 1.1. TLS 1.3 improves upon TLS 1.2 by simplifying the handshake process and making it more resistant to man-in-the-middle attacks. In addition, TLS 1.3 introduces new cryptographic suites that offer better security than the suites used in TLS 1.2.

TLS 1.2 and TLS 1.3 are both backward compatible with TLS 1.1 and earlier versions of the protocol. This means that a client that supports TLS 1.2 can communicate with a server that supports TLS 1.1 and vice versa. However, TLS 1.2 and TLS 1.3 are not compatible with each other. A client that supports TLS 1.2 cannot communicate with a server that supports TLS 1.3, and vice versa.

TLS 1.2 is the most widely used version of the TLS protocol, but TLS 1.3 is gaining in popularity. Many major web browsers, including Google Chrome, Mozilla Firefox, and Microsoft Edge, now support TLS 1.3. In addition, major Internet services providers, such as Cloudflare and Akamai, have started to support TLS 1.3 on their servers. Please visit this page if you want to deeply review the comparison of TLS implementations across different supported servers and clients.

Please visit these posts to learn more about TLS 1.2 and TLS 1.3:

  1. What Is SSL/TLS? How SSL, TLS 1.2, And TLS 1.3 Differ From Each Other?
  2. Decoding TLS v1.2 protocol Handshake with Wireshark
  3. Decoding TLS 1.3 Protocol Handshake With Wireshark
  4. How to Enable TLS 1.3 in Standard Web Browsers?
  5. How to Enable TLS 1.3 on Popular Web Servers?
  6. How to Enable TLS 1.2 and TLS 1.3 on Windows Server
  7. How to Disable TLS 1.0 and TLS 1.1 on Your Apache Server?
  8. How to Disable TLS 1.0 and TLS 1.1 on Your Nginx Server?

How to Disable TLS 1.0 and TLS 1.1 on Windows Server?

We have covered 3 different ways to disable TLS 1.0 and TLS 1.1 on your Windows Server in this post. You can choose any one of the three ways to disable TLS 1.0 and TLS 1.1 on your Windows Server depending on your technical and automation skills.

  1. Disable TLS 1.0 and TLS 1.1 manually using Registry
  2. Disable TLS 1.0 and TLS 1.1 using Powershell Commands
  3. Disable TLS 1.0 and TLS 1.1 using CMD

Note: Microsoft clearly said that it doesn’t support TLS 1.0 and TLS 1.1 on Windows operating systems. No patches will be provided for TLS 1.0 and TLS 1.1 from Microsoft. You can refer to the below table that shows the Microsoft Schannel Provider support of TLS protocol versions.

TLS Protocols Supported by Windows Operating Systems:

Windows OSTLS 1.0 ClientTLS 1.0 ServerTLS 1.1 ClientTLS 1.1 ServerTLS 1.2 ClientTLS 1.2 ServerTLS 1.3 ClientTLS 1.3 Server
Windows Vista/Windows Server 2008EnabledEnabledNot supportedNot supportedNot supportedNot supportedNot supportedNot supported
Windows Server 2008 with Service Pack 2 (SP2)EnabledEnabledDisabledDisabledDisabledDisabledNot supportedNot supported
Windows 7/Windows Server 2008 R2EnabledEnabledDisabledDisabledDisabledDisabledNot supportedNot supported
Windows 8/Windows Server 2012EnabledEnabledEnabledEnabledEnabledEnabledNot supportedNot supported
Windows 8.1/Windows Server 2012 R2EnabledEnabledEnabledEnabledEnabledEnabledNot supportedNot supported
Windows 10, version 1507EnabledEnabledEnabledEnabledEnabledEnabledNot supportedNot supported
Windows 10, version 1511EnabledEnabledEnabledEnabledEnabledEnabledNot supportedNot supported
Windows 10, version 1607/Windows Server 2016 StandardEnabledEnabledEnabledEnabledEnabledEnabledNot supportedNot supported
Windows 10, version 1703EnabledEnabledEnabledEnabledEnabledEnabledNot supportedNot supported
Windows 10, version 1709EnabledEnabledEnabledEnabledEnabledEnabledNot supportedNot supported
Windows 10, version 1803EnabledEnabledEnabledEnabledEnabledEnabledNot supportedNot supported
Windows 10, version 1809//Windows Server 2019EnabledEnabledEnabledEnabledEnabledEnabledNot supportedNot supported
Windows 10, version 1903EnabledEnabledEnabledEnabledEnabledEnabledNot supportedNot supported
Windows 10, version 1909EnabledEnabledEnabledEnabledEnabledEnabledNot supportedNot supported
Windows 10, version 2004EnabledEnabledEnabledEnabledEnabledEnabledNot supportedNot supported
Windows 10, version 20H2EnabledEnabledEnabledEnabledEnabledEnabledNot SupportedNot Supported
Windows 10, version 21H1EnabledEnabledEnabledEnabledEnabledEnabledNot SupportedNot Supported
Windows 10, version 21H2EnabledEnabledEnabledEnabledEnabledEnabledNot SupportedNot Supported
Windows Server 2022EnabledEnabledEnabledEnabledEnabledEnabledEnabledEnabled
Windows 11EnabledEnabledEnabledEnabledEnabledEnabledEnabledEnabled

Method 1: Disable TLS 1.0 and TLS 1.1 manually using Registry

Let’s begin learning how to disable TLS 1.0 and TLS 1.1 manually using Windows Registry.

Step 1: Open the regedit utility

Open ‘Run‘, type ‘regedit’, and click ‘OK’.

Open Regedit Utility On Windows 1
Step 2: Create a New Key

In Registry Editor, navigate to the path: Computer\HKEY_LOCAL_MACHINE\SYSTEM\CurrentControlSet\Control\SecurityProviders\SCHANNEL\Protocols.
Create a new key by Right click on ‘Protocols‘ –> New –> Key.

Create New Key On Windows 1
Step 3: Rename the Registry Key ‘TLS 1.0’

Name key as ‘TLS 1.0‘Rename the registry key as ‘TLS 1.0‘.

Rename The Registry Key Tls 1 0
Step 4 Create One More Registry Key ‘Client’ underneath ‘TLS 1.0’

As smiler to the above step, create another key as ‘Client‘ underneath ‘TLS 1.0‘ as shone in this picture.

Create One More Registry Key Client Underneath Tls 1 0
Step 5: Create New Item ‘DWORD (32-bit) Value’ Underneath ‘Client’

Create a new item by right-clicking on ‘Client‘, and selecting ‘New’ –> DWORD (32-bit) Value.

Create New Item Dword 32 Bit Value Underneath Client
Step 6: Rename the Item ‘DWORD (32-bit) Value’ to ‘Enable’

We Name the item ‘Enabled‘ with a Hexadecimal value of ‘0‘.

Rename The Item Dword 32 Bit Value To Enable
Step 7: Create another item, ‘DisabledByDefault’ Underneath TLS 1.0

Similarly, create another item, ‘DisabledByDefault‘, with a Hexadecimal value of ‘1‘.

Create Another Item Disabledbydefault Underneath Tls 1 0
Step 8: Create ‘Server’ and corresponding Keys as in the case of ‘Client’

Similar to the above steps, create a key ‘Server‘ under ‘Protocols‘ and create registry items ‘DWORD (32-bit)’ and ‘Enabled’ as shown below.

Step 9: Disable TLS 1.1 on the Windows Server

Similar to the above steps, create a key ‘TLS 1.1’ under ‘Protocols‘ and below keys and items to Disable ‘TLS 1.1’


> HKEY_LOCAL_MACHINE\SYSTEM\CurrentControlSet\Control\SecurityProviders\SCHANNEL\Protocols\TLS 1.1\Client\Enabled with Hexadecimal value as ‘0’> HKEY_LOCAL_MACHINE\SYSTEM\CurrentControlSet\Control\SecurityProviders\SCHANNEL\Protocols\TLS 1.1\Client\DisabledByDefault with Hexadecimal value as ‘1’


> HKEY_LOCAL_MACHINE\SYSTEM\CurrentControlSet\Control\SecurityProviders\SCHANNEL\Protocols\TLS 1.1\Server\Enabled with Hexadecimal value as ‘0’> HKEY_LOCAL_MACHINE\SYSTEM\CurrentControlSet\Control\SecurityProviders\SCHANNEL\Protocols\TLS 1.1\Server\DisabledByDefault with Hexadecimal value as ‘1’

Create Server And Corresponding Keys As In The Case Of Client 1 1

Method 2: Disable TLS 1.0 and TLS 1.1 using Powershell commands

Follow this simple procedure to enable TLS 1.2 and TLS 1.2 using Powershell commands.

  1. Open Powershell as Administrator
Open Powershell As Administrator 1

2. Run the below commands to create Registry entries

- New-Item 'HKLM:\SYSTEM\CurrentControlSet\Control\SecurityProviders\SCHANNEL\Protocols\TLS 1.0\Server' -Force
- New-ItemProperty -Path 'HKLM:\SYSTEM\CurrentControlSet\Control\SecurityProviders\SCHANNEL\Protocols\TLS 1.0\Server' –PropertyType 'DWORD' -Name 'Enabled' -Value '0' 
- New-ItemProperty -Path 'HKLM:\SYSTEM\CurrentControlSet\Control\SecurityProviders\SCHANNEL\Protocols\TLS 1.0\Server' –PropertyType 'DWORD' -Name 'DisabledByDefault' -Value '1' 

- New-Item 'HKLM:\SYSTEM\CurrentControlSet\Control\SecurityProviders\SCHANNEL\Protocols\TLS 1.0\Client' -Force
- New-ItemProperty -Path 'HKLM:\SYSTEM\CurrentControlSet\Control\SecurityProviders\SCHANNEL\Protocols\TLS 1.0\Client' -PropertyType 'DWORD' -Name 'Enabled' -Value '0'
- New-ItemProperty -Path 'HKLM:\SYSTEM\CurrentControlSet\Control\SecurityProviders\SCHANNEL\Protocols\TLS 1.0\Client' –PropertyType 'DWORD' -Name 'DisabledByDefault' -Value '1' 


- New-Item 'HKLM:\SYSTEM\CurrentControlSet\Control\SecurityProviders\SCHANNEL\Protocols\TLS 1.1\Server' -Force
- New-ItemProperty -Path 'HKLM:\SYSTEM\CurrentControlSet\Control\SecurityProviders\SCHANNEL\Protocols\TLS 1.1\Server' –PropertyType 'DWORD' -Name 'Enabled' -Value '0' 
- New-ItemProperty -Path 'HKLM:\SYSTEM\CurrentControlSet\Control\SecurityProviders\SCHANNEL\Protocols\TLS 1.1\Server' –PropertyType 'DWORD' -Name 'DisabledByDefault' -Value '1' 

- New-Item 'HKLM:\SYSTEM\CurrentControlSet\Control\SecurityProviders\SCHANNEL\Protocols\TLS 1.1\Client' -Force
- New-ItemProperty -Path 'HKLM:\SYSTEM\CurrentControlSet\Control\SecurityProviders\SCHANNEL\Protocols\TLS 1.1\Client' -PropertyType 'DWORD' -Name 'Enabled' -Value '0'
- New-ItemProperty -Path 'HKLM:\SYSTEM\CurrentControlSet\Control\SecurityProviders\SCHANNEL\Protocols\TLS 1.1\Client' –PropertyType 'DWORD' -Name 'DisabledByDefault' -Value '1'

Before running the commands, you can see no items exist underneath Protocol.

No Items Were Exist Underneath Protocol 1

After running the commands you can see there are two keys created ‘TLS 1.0’ & ‘TLS 1.1’, Underneath each protocol there are ‘Client’ &’ Server’ Keys inside them there are two items ‘DisableByDefault’ & ‘Enabled’.

List Of Item Created Underneath Client And Server Using Powershell Commands

Method 3: Disable TLS 1.0 and TLS 1.1 on Windows Server using CMD

Follow this simple procedure to disable TLS 1.0 and TLS 1.1 using CMD comments.

  1. Open ‘Command Prompt’ as Administrator
Open Command Prompt As Administrator On The Windows Server 1

2. Run the below commands to create Registry entries.

reg add "HKEY_LOCAL_MACHINE\SYSTEM\CurrentControlSet\Control\SecurityProviders\SCHANNEL\Protocols\TLS 1.0\Server" /v Enabled /t REG_DWORD /d 0 /f 

reg add "HKEY_LOCAL_MACHINE\SYSTEM\CurrentControlSet\Control\SecurityProviders\SCHANNEL\Protocols\TLS 1.0\Server" /v DisabledByDefault /t REG_DWORD /d 1 /f

reg add "HKEY_LOCAL_MACHINE\SYSTEM\CurrentControlSet\Control\SecurityProviders\SCHANNEL\Protocols\TLS 1.0\Client" /v Enabled /t REG_DWORD /d 0 /f 

reg add "HKEY_LOCAL_MACHINE\SYSTEM\CurrentControlSet\Control\SecurityProviders\SCHANNEL\Protocols\TLS 1.0\Client" /v DisabledByDefault /t REG_DWORD /d 1 /f


reg add "HKEY_LOCAL_MACHINE\SYSTEM\CurrentControlSet\Control\SecurityProviders\SCHANNEL\Protocols\TLS 1.1\Server" /v Enabled /t REG_DWORD /d 0 /f 

reg add "HKEY_LOCAL_MACHINE\SYSTEM\CurrentControlSet\Control\SecurityProviders\SCHANNEL\Protocols\TLS 1.1\Server" /v DisabledByDefault /t REG_DWORD /d 1 /f

reg add "HKEY_LOCAL_MACHINE\SYSTEM\CurrentControlSet\Control\SecurityProviders\SCHANNEL\Protocols\TLS 1.1\Client" /v Enabled /t REG_DWORD /d 0 /f 

reg add "HKEY_LOCAL_MACHINE\SYSTEM\CurrentControlSet\Control\SecurityProviders\SCHANNEL\Protocols\TLS 1.1\Client" /v DisabledByDefault /t REG_DWORD /d 1 /f

We hope this post will help you know how to disable TLS 1.0 and TLS 1.1 on your Windows Server as they are deprecated for their weak security. Please share this post if you find this interested. Visit our social media page on FacebookLinkedInTwitterTelegramTumblrMedium & Instagram, and subscribe to receive updates like this.

Source :
https://thesecmaster.com/blog/how-to-disable-tls-1-0-and-tls-1-1-on-windows-server

How to Enable TLS 1.2 and TLS 1.3 on Windows Server?

Arun KL
November 14, 2023
8minutes

Growing trends in cyber attacks made system administrators implement more secured communication protocols to protect their assets and network from attacks. TLS plays a vital role in the implementation stack. TLS is a critical security protocol that is used to encrypt communications between clients and servers. TLS 1.3 is the latest version of the Transport Layer Security (TLS) protocol and offers many advantages over their previous versions. TLS 1.2 is the most widely used version of the TLS protocol, but TLS 1.3 is gaining popularity. As a system administrator, you should enable TLS 1.2 and TLS 1.3 on your Windows Server to enhance the security of your infrastructure.

Why Should You Enable TLS 1.2 and TLS 1.3 on Windows Server?

As a windows administrator, it is not just your duty to take care the system’s health. But, it is also your responsibility to create a secure environment to protect your Windows from internal and external threats. TLS 1.2 and TLS 1.3 are the new and most secure transport layer security protocols. As a system administrator, you should enable TLS 1.2 and TLS 1.3 on your Windows Server for the following reasons:

  1. Both TLS 1.2 and TLS 1.3 introduces new cryptographic suites that offer better security than the suites used in older TLS and SSL protocols.
  2. Both TLS 1.2 and TLS 1.3 are more resistant to man-in-the-middle attacks and simplify the handshake process, which makes it more difficult for attackers to eavesdrop on communications.
  3. TLS 1.3 simplifies the handshake process and removes unnecessary cryptographic overhead, which results in a faster connection time.

How to Enable TLS 1.2 and TLS 1.3 on Windows Server?

We have covered 3 different ways to enable TLS 1.2 and TLS 1.3 on your Windows Server in this post. You can choose any one of the three ways to enable TLS 1.2 and TLS 1.3 on your Windows Server depending on your technical and automation skills.

  1. Enable TLS 1.2 and TLS 1.3 manually using Registry
  2. Enable TLS 1.2 and TLS 1.3 using Powershell Commands
  3. Enable TLS 1.2 and TLS 1.3 using CMD

Microsoft clearly said that it supports TLS 1.3 only on Windows 10 (version 1903 later), Windows 11, Windows Server 2022, and above operating systems. No support will be provided for TLS 1.3 below Windows 10 22H2 and Windows Server 2022. You can refer to the below table that shows the Microsoft Schannel Provider support of TLS protocol versions.

Note: Windows 2019 does not support TLS 1.3.

TLS Protocols Supported by Windows Operating Systems:

Windows OSTLS 1.0 ClientTLS 1.0 ServerTLS 1.1 ClientTLS 1.1 ServerTLS 1.2 ClientTLS 1.2 ServerTLS 1.3 ClientTLS 1.3 Server
Windows Vista/Windows Server 2008EnabledEnabledNot supportedNot supportedNot supportedNot supportedNot supportedNot supported
Windows Server 2008 with Service Pack 2 (SP2)EnabledEnabledDisabledDisabledDisabledDisabledNot supportedNot supported
Windows 7/Windows Server 2008 R2EnabledEnabledDisabledDisabledDisabledDisabledNot supportedNot supported
Windows 8/Windows Server 2012EnabledEnabledEnabledEnabledEnabledEnabledNot supportedNot supported
Windows 8.1/Windows Server 2012 R2EnabledEnabledEnabledEnabledEnabledEnabledNot supportedNot supported
Windows 10, version 1507EnabledEnabledEnabledEnabledEnabledEnabledNot supportedNot supported
Windows 10, version 1511EnabledEnabledEnabledEnabledEnabledEnabledNot supportedNot supported
Windows 10, version 1607/Windows Server 2016 StandardEnabledEnabledEnabledEnabledEnabledEnabledNot supportedNot supported
Windows 10, version 1703EnabledEnabledEnabledEnabledEnabledEnabledNot supportedNot supported
Windows 10, version 1709EnabledEnabledEnabledEnabledEnabledEnabledNot supportedNot supported
Windows 10, version 1803EnabledEnabledEnabledEnabledEnabledEnabledNot supportedNot supported
Windows 10, version 1809//Windows Server 2019EnabledEnabledEnabledEnabledEnabledEnabledNot supportedNot supported
Windows 10, version 1903EnabledEnabledEnabledEnabledEnabledEnabledNot supportedNot supported
Windows 10, version 1909EnabledEnabledEnabledEnabledEnabledEnabledNot supportedNot supported
Windows 10, version 2004EnabledEnabledEnabledEnabledEnabledEnabledNot supportedNot supported
Windows 10, version 20H2EnabledEnabledEnabledEnabledEnabledEnabledNot SupportedNot Supported
Windows 10, version 21H1EnabledEnabledEnabledEnabledEnabledEnabledNot SupportedNot Supported
Windows 10, version 21H2EnabledEnabledEnabledEnabledEnabledEnabledNot SupportedNot Supported
Windows Server 2022EnabledEnabledEnabledEnabledEnabledEnabledEnabledEnabled
Windows 11EnabledEnabledEnabledEnabledEnabledEnabledEnabledEnabled

Method 1 : Enable TLS 1.2 and TLS 1.3 manually using Registry

Let’s begin learning how to enable TLS 1.2 and TLS 1.3 manually using Windows Registry.

Method 1 : Enable TLS 1.2 and TLS 1.3 manually using Registry

Step 1. Open regedit utility

Open ‘Run‘, type ‘regedit‘ and click ‘OK‘.

Open Regedit Utility On Windows 1
Step 2. Create New Key

In Registry Editor, navigate to the path : HKEY_LOCAL_MACHINE\SYSTEM\CurrentControlSet\Control\SecurityProviders\SCHANNEL\Protocols
Create a new key by Right click on ‘Protocols‘ –> New –> Key

Create New Key On Windows 1
Step 3. Rename the Registry Key ‘TLS 1.2’

Rename the  registry key as ‘TLS 1.2‘.

Rename The Registry Key Tls 1 2
Step 4. Create One More Registry Key ‘Client’ underneath ‘TLS 1.2’

As smiler to the above step, create another key as ‘Client‘ underneath ‘TLS 1.2‘ as shone in this picture.

Create One More Registry Key Client Underneath Tls 1 2
Step 5. Create New Item ‘DWORD (32-bit) Value’ Underneath ‘Client’, select ‘New’

Create new  item by right click on ‘Client‘, select ‘New’ –> DWORD (32-bit) Value.

Create New Item Dword 32 Bit Value Underneath Client Select New
Step 6. Rename the Item ‘DWORD (32-bit) Value’ to ‘DisabledByDefault’

Name the item as ‘DisabledBy Default’ with Hexadecimal value as ‘0’.

Rename The Item Dword 32 Bit Value To Disableby Default
Step 7. Create another item, ‘Enabled’ Underneath TLS 1.2

Similarly create another item, ‘Enabled‘ with Hexadecimal value as ‘1‘.

Create Another Item Enabled Underneath Tls 1 2
Step 8. List of Item Created underneath ‘Client’

After registry item creations underneath ‘Client’, it looks as below.

List Of Item Created Underneath Client
Step 9. Create ‘Server’ and corresponding Keys as in the case of ‘Client’

Similar to above steps, create a key ‘Server’ under ‘Protocols’ and create ‘DWORD (32-bit)’ and ‘Enabled’ as shown below.
– HKEY_LOCAL_MACHINE\SYSTEM\CurrentControlSet\Control\SecurityProviders\SCHANNEL\Protocols\TLS 1.2\Server\Enabled with Hexadecimal value as ‘1’– HKEY_LOCAL_MACHINE\SYSTEM\CurrentControlSet\Control\SecurityProviders\SCHANNEL\Protocols\TLS 1.2\Server\DisabledByDefault with Hexadecimal value as ‘0’

Create Server And Corresponding Keys As In The Case Of Client
Step 10. Enable TLS 1.3 on the Windows Server

Similar to above steps, create a ‘DWORD (32-bit)’ and ‘Enabled’ items in the below path to enable TLS 1.3
Note: TLS 1.3 is supported in Windows 11 & Windows server 2022 onwards.
– HKEY_LOCAL_MACHINE\SYSTEM\CurrentControlSet\Services\HTTP\Parameters\EnableHTTP3 with Hexadecimal value as ‘1’

Enable Tls 1 3 On The Windows Server

Method 2 : Enable TLS 1.2 and TLS 1.3 on Windows Server using Powershell Commends

Follow this simple procedure to enable TLS 1.2 and TLS 1.2 using Powershell comments.

Step 1. Open Powershell as Administrator
Open Powershell As Administrator 1
Step 2. Run below commands to create Registry entry
TLS 1.2
- New-Item 'HKLM:\SYSTEM\CurrentControlSet\Control\SecurityProviders\SCHANNEL\Protocols\TLS 1.2\Client' -Force

- New-ItemProperty -Path 'HKLM:\SYSTEM\CurrentControlSet\Control\SecurityProviders\SCHANNEL\Protocols\TLS 1.2\Client' –PropertyType 'DWORD' -Name 'DisabledByDefault' -Value '0'

- New-ItemProperty -Path 'HKLM:\SYSTEM\CurrentControlSet\Control\SecurityProviders\SCHANNEL\Protocols\TLS 1.2\Client' -PropertyType 'DWORD' -Name 'Enabled' -Value '1'


- New-Item 'HKLM:\SYSTEM\CurrentControlSet\Control\SecurityProviders\SCHANNEL\Protocols\TLS 1.2\Server' -Force

- New-ItemProperty -Path 'HKLM:\SYSTEM\CurrentControlSet\Control\SecurityProviders\SCHANNEL\Protocols\TLS 1.2\Server' –PropertyType 'DWORD' -Name 'DisabledByDefault' -Value '0'

- New-ItemProperty -Path 'HKLM:\SYSTEM\CurrentControlSet\Control\SecurityProviders\SCHANNEL\Protocols\TLS 1.2\Server' –PropertyType 'DWORD' -Name 'Enabled' -Value '1'


TLS 1.3 (Supports in Windows 11 & Windows Server 2022) 
- New-ItemProperty -Path 'HKLM:\SYSTEM\CurrentControlSet\services\HTTP\Parameters' -PropertyType 'DWORD' -Name 'EnableHttp3' -Value '1'

Before running the commands you can see no items were exist underneath Protocol.

No Items Were Exist Underneath Protocol

After running the commands you can see there are two keys created ‘TLS 1.2’ & ‘TLS 1.3’, Underneath each protocols there are ‘Client’ &’Server’ Keys inside them ther are two items ‘DisableByDefault’ & ‘Enabled’.

List Of Item Created Underneath Client Using Powershell Commends
List Of Item Created Underneath Server Using Powershell Commends
Enable Tls 1 3 On The Windows Server

Method 3: Enable TLS 1.2 and TLS 1.3 on Windows Server using native CMD

Follow this simple procedure to enable TLS 1.2 and TLS 1.2 using CMD comments.

Step 1. Open ‘Command Prompt’ as Administrator
Open Command Prompt As Administrator On The Windows Server 1
Step 2. Run below commands to create Registry entry.
TLS 1.2
- reg add "HKEY_LOCAL_MACHINE\SYSTEM\CurrentControlSet\Control\SecurityProviders\SCHANNEL\Protocols\TLS 1.2\Client" /v DisabledByDefault /t REG_DWORD /d 0 /f

- reg add "HKEY_LOCAL_MACHINE\SYSTEM\CurrentControlSet\Control\SecurityProviders\SCHANNEL\Protocols\TLS 1.2\Client" /v Enabled /t REG_DWORD /d 1 /f


- reg add "HKEY_LOCAL_MACHINE\SYSTEM\CurrentControlSet\Control\SecurityProviders\SCHANNEL\Protocols\TLS 1.2\Server" /v DisabledByDefault /t REG_DWORD /d 0 /f

- reg add "HKEY_LOCAL_MACHINE\SYSTEM\CurrentControlSet\Control\SecurityProviders\SCHANNEL\Protocols\TLS 1.2\Server" /v Enabled /t REG_DWORD /d 1 /f


TLS 1.3 (Supports in Windows 11 & Windows Server 2022)
- reg add "HKEY_LOCAL_MACHINE\SYSTEM\CurrentControlSet\services\HTTP\Parameters" /v EnableHttp3 /t REG_DWORD /d 1 /f

We hope this post will help you know how to enable TLS 1.2 and TLS 1.3 on your Windows Server to enhance the security of your infrastructure. Please share this post if you find this interesting. Visit our social media page on FacebookLinkedInTwitterTelegramTumblrMedium & Instagram, and subscribe to receive updates like this.

Source :
https://thesecmaster.com/blog/how-to-enable-tls-1-2-and-tls-1-3-on-windows-server

SANS’s 2024 Threat-Hunting Survey Review

By: Trend Micro
June 04, 2024
Read time: 3 min (709 words)

In its ninth year, the annual SANS Threat Hunting Survey delves into global organizational practices in threat hunting, shedding light on the challenges and adaptations in the landscape over the past year.

The 2024 survey highlights a growing maturity in threat-hunting methodologies, with a significant increase in organizations adopting formal processes.

This marks a shift towards a more standardized approach in cybersecurity strategies despite challenges such as skill shortages and tool limitations. Additionally, the survey reveals evolving practices in sourcing intelligence and an increase in outsourcing threat hunting, raising questions about the efficiency and alignment with organizational goals. This summary encapsulates the essential findings and trends, emphasizing the critical role of threat hunting in contemporary cybersecurity frameworks.

Participants

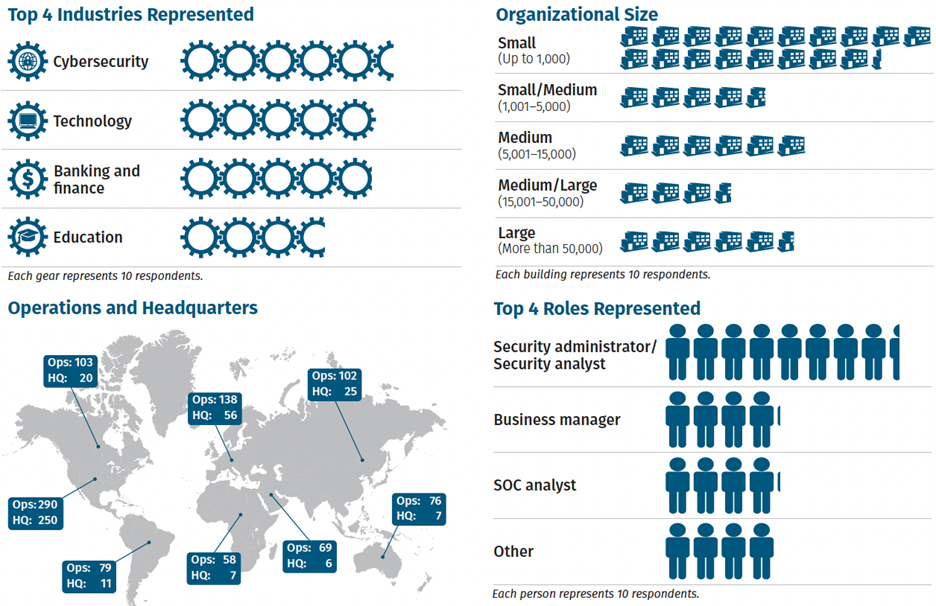
survey demographics
Figure 1: Survey demographics

This year’s survey attracted participants from a wide array of industries, with cybersecurity leading at 15% and 9% of respondents from the manufacturing sector, which has recently faced significant challenges from ransomware attacks. The survey participants varied in organization size, too, ranging from those working in small entities with less than 100 employees (24%) to large corporations with over 100,000 employees (9%).

The respondents play diverse roles within their organizations, highlighting the multidisciplinary nature of threat hunting. Twenty-two percent are security administrators or analysts, while 11% hold business manager positions, showcasing a balance between technical, financial, and personnel perspectives in threat-hunting practices.

However, the survey does note a geographical bias, with 65% of participants coming from organizations based in the United States, which could influence the findings related to staffing and organizational practices, though it’s believed not to affect the technical aspects of threat hunting.

Significant findings and implications

The survey examines the dynamic landscape of cyber threats and the strategies deployed by threat hunters to identify and counteract these risks. Notably, it sheds light on the prevalent types of attacks encountered:

  • Business email compromise (BEC): BEC emerges as the foremost concern, with approximately 68% of respondents reporting its detection. BEC involves malicious actors infiltrating legitimate email accounts to coerce individuals into transferring funds through social engineering tactics.
  • Ransomware: Following closely behind is ransomware, detected by 64% of participants. Ransomware operations encrypt data and demand payment for decryption, constituting a significant threat in the cybersecurity landscape.
  • Tactics, techniques, and procedures (TTPs): The survey found that TTPS are employed in different attack scenarios. In ransomware incidents, threat actors often deploy custom malware, target specific data for exfiltration, utilize off-the-shelf tools like Cobalt Strike, attempt to delete traces, and sometimes resort to physical intrusion into target companies.

Evolving threat-hunting practices

SANS also found that organizations have significantly evolved their threat-hunting practices, with changes in methodologies occurring as needed, monthly, quarterly, or annually.

Outsourced threat hunting is now used by 37% of organizations, and over half have adopted clearly defined methodologies for threat hunting, marking a notable advancement.

Additionally, 64% of organizations formally evaluate the effectiveness of their threat-hunting efforts, showing a decrease in those without formal methodologies from 7% to 2%. The selection of methods is increasingly influenced by available human resources, recognized by 47% of organizations.

The chief information security officer (CISO) plays a key role in developing threat-hunting methodologies, with significant involvement in 40% of cases.

Benefits of better threat-hunting efforts

Significant benefits from threat hunting include improved attack surface and endpoint security, more accurate detections with fewer false positives, and reduced remediation resources.

About 30% of organizations use vendor information as supplemental threat intelligence, with 14% depending solely on it. Incident response teams’ involvement in developing threat-hunting methodologies rose to 33% in 2024, indicating better integration within security functions.

Challenges such as data quality and standardization issues are increasing, underscoring the complexities of managing expanding cybersecurity data.

Final thoughts

The SANS 2024 Threat Hunting Survey highlights the cybersecurity industry’s evolution and focuses on improving cyber defense capabilities. Organizations aim to enhance threat hunting with better contextual awareness and data tools, with 51% looking to improve response to nuanced threats.

Nearly half (47%) plan to implement AI and ML to tackle the increasing complexity and volume of threats. There’s a significant planned investment in both staff and tools, with some organizations intending to increase their investment by over 10% or even 25% in the next 24 months, emphasizing threat hunting’s strategic importance.

However, a small minority anticipate reducing their investment, hinting at a potential shift in security strategy.

Source :
https://www.trendmicro.com/en_us/research/24/f/sans-2024-threat-hunting-survey-review.html

Not Just Another 100% Score: MITRE ENGENUITY ATT&CK

By: Trend Micro
June 18, 2024
Read time: 4 min (1135 words)

The latest MITRE Engenuity ATT&CK Evaluations pitted leading managed detection and response (MDR) services against threats modeled on the menuPass and BlackCat/AlphV adversary groups. Trend Micro achieved 100% detection across all 15 major attack steps with an 86% actionable rate for those steps— balancing detections and business priorities including operational continuity and minimized disruption.

Trend took part in the MITRE Engenuity ATT&CK Evaluations for managed detection and response (MDR) services—building on a history of strong performance in other MITRE Engenuity tests. Key to that ongoing success is our platform approach, which provides high-fidelity detection of early- and mid-chain tactics, techniques, and procedures (TTPs) enabling quick and decisive counteractions before exfiltration or encryption can occur. Of course, we know real-world outcomes matter more than lab results. That’s why we’re proud to support thousands of customers worldwide with MDR that brings the most native extended detection and response (XDR) telemetry, leading threat intelligence from Trend™ Research and our Trend Micro™ Zero-Day Initiative™ (ZDI) under a single service to bridge real-time threat protection and cyber risk management. 

The evaluation focused on our Trend Service One™ offering, powered by Trend Vision One, which included XDR, endpoint and network security capabilities. The results proved Trend Micro MDR is a great alternative to managed services that rely on open XDR platforms or managed SIEM platforms.

Our detection of adversarial activity early in the attack chain combined with our platform’s deeply integrated native response capabilities enables rapid mean-time-to-detect (MTTD) and mean-time-to-respond (MTTR). At the same time, comprehensive visibility and protection gives security teams greater confidence.

MITRE ENGENUITY ATTACK EVALUATIONS Managed Services Badge

Full detection across all major steps

This most recent MITRE Engenuity ATT&CK Evaluations for Managed Services featured attacks modeled on the real-world adversaries menuPass and BlackCat/AlphV. These took the form of advanced persistent threats (APTs) designed to dwell in the network post-breach and execute harmful activity over time.

Trend MDR achieved full detection coverage, reflecting and reinforcing our achievements in cybersecurity:

  • 100% across all  major attack steps
  • 100% for enriched detail on TTPs
  • 86% actionable rate for major steps

How Trend MDR delivers

To put its MDR evaluation in context, MITRE Engenuity conducted a survey prior to testing, gaining insights into market perceptions and expectations of managed cybersecurity services. More than half (58%) of respondents said they rely on managed services either to complement their in-house SOC or as their main line of defense. For companies with fewer than 5,000 employees, that tally increased to 68%.

Our MDR service at Trend helps meet those needs by combining AI techniques with human threat expertise and analysis. We correlate data and detect threats that might otherwise slip by as lower severity alerts. Our experts prioritize threats by severity, determine the root cause of attacks, and develop detailed response plans.

XDR is a key technology to achieve these security outcomes, extending visibility beyond endpoints to other parts of the environment where threats can otherwise go undetected: servers, email, identities, mobile devices, cloud workloads, networks, and operational technologies (OT). 

Integrated with native XDR insights is deep, global threat intelligence. Native telemetry enables high-fidelity detections, strong correlations and rich context; global threat intelligence brings highly relevant context to detect threats faster and more precisely. Combined with a broad third-party integration ecosystem and response automation across vectors, Trend Vision One introduces a full-spectrum SOC platform for security teams to speed up investigations and frees up time to focus on high-value, proactive security work including threat hunting and detection engineering. In some cases, smaller teams rely on our MDR service completely for their security operations.

With Trend Vision One, teams have access to a continuously updated and growing library of detection models—with the ability to build custom detection models to fit their unique threat models.

Proven strength in delivering higher-confidence alerts

Security and security operations center (SOC) teams are inundated with detection alerts and noise. Our visibility and analytics performance achieves a finely tuned balance between providing early alerts of critical adversarial tactics and techniques and managing alert fatigue to improve the analyst experience. Our MDR operations team takes advantage of the platform advantage and knows only to alert customers when critical.

In each simulation during the MITRE Engenuity ATT&CK Evaluations, there was no scenario where menuPass and BlackCat/AlphV attack attempts successfully breached the environment without being detected or disrupted.

It’s important to note that MITRE Engenuity doesn’t rank products or solutions. It provides objective measures but no scores. Instead, since every service and solution functions differently, the evaluation reveals areas of strength and opportunities for improvement within each offering. 

About the attacks

The menuPass threat group has been active since at least 2006. Some of its members have been associated with the Tianjin State Security Bureau of the Chinese Ministry of State Security and with the Huaying Haitai Science and Technology Development Company. It has targeted healthcare, defense, aerospace, finance, maritime, biotechnology, energy, and government targets—and in 2016–17 went after managed IT service providers. BlackCat is Rust-based ransomware offered as a service and first observed in November 2021. It has been used to target organizations across Africa, the Americas, Asia, Australia, and Europe in a range of sectors. 

Putting our service to the test

In cybersecurity, actions speak louder than words. Our significant investment in research and development extend to our MDR service offering to support thousands of enterprises around the world.

We’re dedicated to continuous iteration and improvement to equip security teams with cutting-edge solutions to keep their organizations safe. As we evolve our solutions, MITRE Engenuity continues to evolve its evaluation approach as well. The category of “actionability” was new in this evaluation, determining if each alert provided enough context for the security analyst to act on. The actionability testing category is an area we’re investing in heavily from a process and technology standpoint to ensure contextual awareness, prioritization, and intelligent guidance are included while maintaining manageable communication cadences and minimizing false positive alerts.

Overall, areas for improvement surfaced through the test scenarios have been resourced with dedicated engineering and development efforts to match the high standard we hold ourselves to-and that our users expect. We are pleased to see our MDR service demonstrated a strong balance of detection capabilities across the entire attack chain, both within the service itself and embedded in the underlying Trend Vision One platform.

We invite all our MDR customers to take a look at the MITRE Engenuity ATT&CK Evaluations for Managed Services to better understand the strength of their defensive posture, and to come to us with any questions or thoughts.

Next steps

For more on Trend MDR, XDR, and other related topics, check out these additional resources:

Forward vision

At Trend, we are dedicated to continuous iteration and improvement to equip security teams with cutting-edge solutions to keep their organizations safe. These relevant areas of improvement surfaced through the scenarios have been resourced with dedicated engineering and development efforts to match the high standard we hold ourselves to and which our users expect.

Source :
https://www.trendmicro.com/en_us/research/24/f/mitre-enginuity-attack-evaluations.html